Root Pixel 7a on Android 15 with an Exact-Build Magisk Image
Rooting the Google Pixel 7a (code-named Lynx) on Android 15 grants complete superuser control over the Tensor G2 architecture, allowing advanced system-level customization, kernel tuning, and deep backup operations. On modern Android releases, rooting is achieved through systemless modifications orchestrated by Magisk. Because the Pixel 7a launched with Linux kernel 5.10, the ramdisk resides in the dedicated init_boot partition rather than the traditional boot partition.
This automated root package provides the required Google platform-tools and fastboot commands in a unified Windows batch script, but it does not include a pre-patched boot image.
Technical Overview and Requirements
Before altering system partitions, understand that unlocking the bootloader wipes user storage and changes Play Integrity results. App behavior and warranty treatment vary; returning to stock does not guarantee restoration of either.
[!CAUTION] You must extract the
init_boot.imgfrom the official factory image that exactly matches your current firmware build number. Patching an image from a different build, even if it is the same Android version and device model, will result in a bootloop. Magisk officially warns against using pre-patched images from third parties.
| Prerequisite | Details | Importance |
|---|---|---|
| Target Device | Google Pixel 7a (Model: Lynx) running Android 15 | Mandatory |
| Bootloader Status | Unlocked or unlock-eligible (Non-Verizon carrier models) | Mandatory |
| Host System | Windows 10 or Windows 11 PC | Essential |
| Driver Stack | Google USB Drivers installed in Device Manager | Essential |
| Data Cable | OEM or certified USB Type-C data transfer cable | Critical |
| Full Backup | Complete external backup of photos, credentials, and data | Critical |
Warning: Carrier-branded units (specifically Verizon or AT&T locked variants) usually permanently disallow bootloader unlocking (
OEM unlockingappears grayed out in Settings). Do not attempt to flash third-party boot partitions to carrier-locked devices.
For broader background on Pixel rooting architecture, refer to our comprehensive Google Pixel root guide.
How the Automation Script Operates
The package is described as a Windows command runner for standard Android SDK commands. This audit did not authenticate the archive or every bundled executable; inspect its scripts and prefer current official Platform-Tools and Magisk downloads.
- Host Verification: Confirms PC ADB connection and verifies USB debugging authorization.
- Fastboot Transition: Executes
adb reboot bootloaderto transition Lynx into bootloader mode. - Partition Preparation: Issues
fastboot flashing unlockto unlock partition tables if locked. - Ramdisk Injection: Writes the Magisk-patched
init_bootimage to the active partition slot viafastboot flash init_boot. - System Reinitialization: Executes
fastboot rebootto bring the device back into Android.
Download: Pixel 7a Android 15 Root Package
If you use the third-party archive, verify its publisher, full hash, and scripts before execution. A MediaFire landing page does not authenticate the package.
Package Specifications
| Specification | Details |
|---|---|
| Tool Name | Pixel 7a One-Click Root Tool |
| Target OS | Android 15 Builds |
| Hardware Codename | Google Pixel 7a (Lynx) |
| Host Operating System | Windows 7, 8, 10, 11 (64-bit) |
| Archive File Size | ~15 MB |
| Archive Password | gsm6.com |
| Included Components | Magisk APK, Fastboot / ADB Platform Tools, Automation Scripts |
- Root Utility Package: Download Pixel 7a One-Click Root (MediaFire)
- Archive Extraction Password:
gsm6.com
Companion Drivers
Verify your computer recognizes Google fastboot interfaces:
- On Windows, install the official Google USB Driver. Samsung’s driver package is not the Pixel bootloader driver.
- If you prefer manual command-line control, review the Android Platform Tools guide.
Step-by-Step Rooting Procedure
1. Enable OEM Unlocking and USB Debugging
Before the host computer can communicate with low-level interfaces, enable the developer bridge on the handset.
- On your Pixel 7a, open Settings > About phone.
- Scroll to the bottom and tap Build number seven consecutive times until you see the confirmation prompt.
- Return to Settings > System > Developer options.
- Enable the toggle for OEM unlocking.
- Enable the toggle for USB debugging.
2. Prepare Your Custom Patched init_boot Image
Because providing generic patched images is unsafe, you must patch your own:
- Download the official Pixel 7a factory image matching your exact Build number from Google Developers.
- Extract the archive and locate
init_boot.img. - Transfer
init_boot.imgto your phone and patch it using the Magisk app. - Transfer the resulting
magisk_patched_xxxx.imgback to your computer and rename it toinit_boot.img.
3. Download and Extract the Lynx Root Tool
Extract the utility files to a local working directory on your Windows PC.
- Download the zip archive from the link above.
- Extract the archive contents using archive password
gsm6.com. - Verify that the extracted folder contains the batch file
Pixel 7a (lynx) OneClick Root Android 15.bat, along with theadbandfastbootbinaries and the patchedinit_boot.img.
3. Connect Pixel 7a and Launch Root Script
Establish a stable ADB bridge between your workstation and the Pixel 7a.
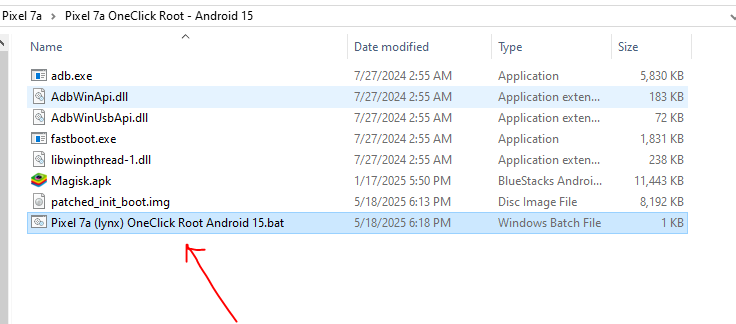
- Connect the Pixel 7a to your PC using a reliable USB-C cable.
- Unlock your phone screen. When the Allow USB debugging? prompt appears, check Always allow from this computer and tap Allow.
- Right-click the batch file
Pixel 7a (lynx) OneClick Root Android 15.batand select Run as administrator. - The tool will check ADB connectivity and automatically send the reboot command to transition into Fastboot mode.
4. Confirm Bootloader Unlock on Handset
When the phone enters Fastboot, the script executes the bootloader unlock instruction.
- Look at your Pixel 7a screen. The device will display a prominent warning screen asking whether to unlock the bootloader.
- Use the Volume Up or Volume Down buttons to highlight Unlock the bootloader.
- Press the Power button once to confirm your selection.
- The phone will perform a factory wipe, reset the hardware keys, and prepare the storage partitions.
- The script will proceed automatically to flash the Magisk-patched
init_bootimage to the active partition slot.
5. Finalize Magisk Setup and Verify Root Access
Once flashing finishes, allow the phone to reboot and complete the initial Android 15 setup wizard.
- Complete the Android welcome screens. (You do not need to restore all accounts immediately).
- Re-enable Developer options and USB debugging.
- Install Magisk from the official Magisk GitHub repository. Do not trust a bundled APK unless its release hash and signature match the official project.
- Open the Magisk app. If prompted that Requires Additional Setup, tap OK and allow the device to reboot once more.
- Launch any root verification utility or run
adb shell sufrom your computer to confirm elevated superuser privileges.
Video Demonstration
Watch the complete bootloader unlock and root procedure in this detailed video walkthrough:
Troubleshooting Common Errors
- Antivirus flags batch script: Security scanners sometimes flag scripts running embedded fastboot/adb commands. Verify the batch script contents by opening it in Notepad to review every raw fastboot command.
- Fastboot command hangs: If the script stalls at
< waiting for any device >, open Windows Device Manager and update the driver for the detected Android interface to the official Google USB driver. - Bootloop or soft-brick: If the device hangs on the Google boot animation, download the official factory image for your build from Google’s developer site, extract
init_boot.img, and runfastboot flash init_boot init_boot.imgto restore the stock kernel ramdisk.