Root Pixel 7 Pro on Android 15 with Magisk | Exact-Build Guide
Gaining administrative superuser access on the Google Pixel 7 Pro (codename cheetah) running Android 15 allows advanced users, mobile developers, and security analysts to bypass standard sandbox restrictions, manage background daemons, and install system-level audio and performance modifications. However, modern Android architectures introduce sophisticated security boundaries that require precise execution during the rooting workflow.
Beginning with Google Tensor G2 and Android 13, Google adopted the Generic Kernel Image (GKI) architecture, which separates the common Linux kernel in boot.img from the first-stage generic ramdisk contained within init_boot.img. Understanding this architectural layout ensures that Magisk root hooks can be deployed smoothly without creating kernel mismatches or triggering boot verification loops.
Technical Architecture: Tensor G2 and init_boot Partitioning
Older Android handsets typically embedded the ramdisk directly inside the primary boot partition. On the Pixel 7 Pro, modifying boot.img directly can cause severe kernel verification failures.
Instead, Magisk modifies the dedicated init_boot partition where the primary system initialization scripts reside. Automated scripting utilities streamline this interaction by verifying device connectivity, handling fastboot bootloader transitions, and flashing the Android 15 init_boot image directly into the active hardware slot.
[!CAUTION] This one-click package does not include a pre-patched
init_bootimage. Magisk officially warns against using pre-patched images from third parties, even for the same device model. The patched image must exactly match the firmware build currently installed on your device. If the versions mismatch, the device will likely bootloop. You must extract and patch your owninit_bootimage using the official Magisk installation guide.
Related guide: Comprehensive Google Pixel Rooting Guide Across Models
Technical Risk Evaluation and Preparation
Before initiating any low-level partition modification, review the operational trade-offs involved in unlocking and rooting:
| Risk Category | Observed Impact | Technical Mitigation |
|---|---|---|
| Cryptographic Data Wipe | Bootloader unlocking completely erases userdata | Perform complete external backups prior to executing fastboot commands |
| Play Integrity Status | Integrity verdicts and protected apps can fail | Do not assume concealment modules restore compatibility; test the apps you depend on |
| Manufacturer Warranty | Service eligibility can vary by region and fault | Review Google’s warranty terms; returning to stock does not guarantee coverage |
| OTA Update Handling | Automated delta OTA updates will pause or fail verification | Apply full monthly factory images or use Magisk inactive slot workflows |
Prerequisites and Utility Download
Ensure your host environment and handset meet these baseline technical prerequisites:
- Host Workstation: PC running Windows 10/11, macOS, or modern Linux.
- Interface Cable: Certified USB Type-C to Type-A data cable connected to a direct host port.
- Android Platform Tools: Latest Google ADB and Fastboot platform binaries.
- Google Android USB Platform Drivers: Required on Windows systems for bootloader device binding.
- Magisk: Obtain the current app only from the official Magisk GitHub repository. This audit did not authenticate the previous third-party automation archive, so this workflow uses official Platform-Tools and an image patched on the same device.
Step-by-Step Rooting Workflow
Follow these disciplined steps to configure your handset, unlock the bootloader, and flash the patched kernel ramdisk.
1. Enable Developer Options and USB Debugging
Configure the Android operating system to permit bootloader communication:
- Open Settings on the Pixel 7 Pro.
- Navigate to About phone and locate the Build number entry at the bottom of the page.
- Tap the Build number seven consecutive times until you receive the confirmation message: “You are now a developer!”
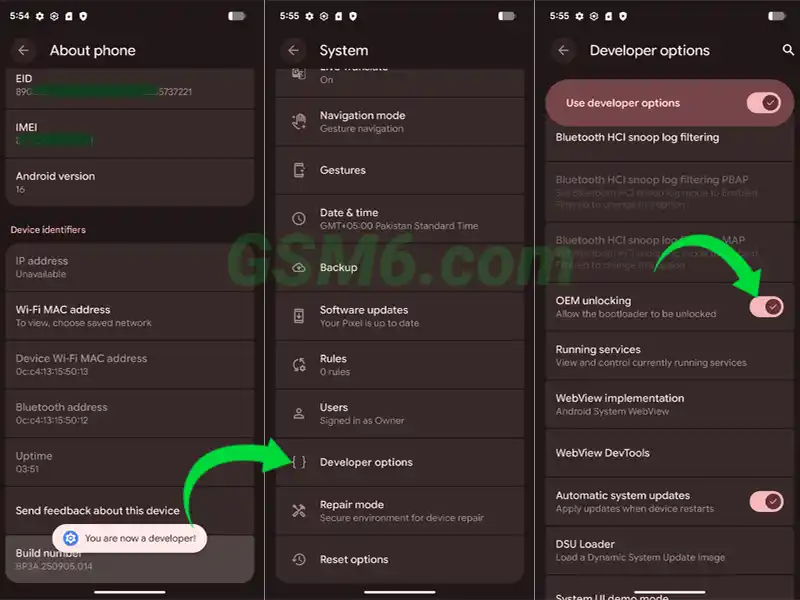
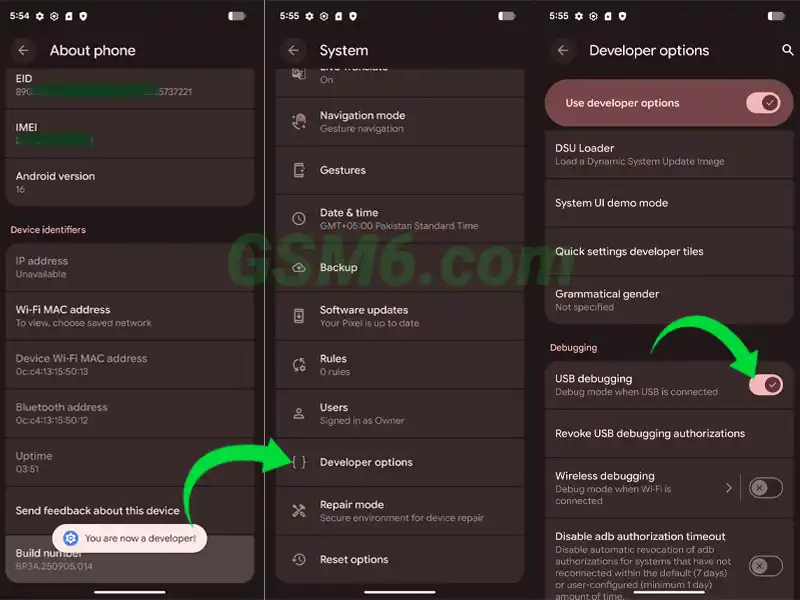
- Return to Settings → System → Developer options.
- Toggle OEM Unlocking and USB Debugging to the active position. (Ensure the handset has an active internet connection if OEM Unlocking appears grayed out initially).
2. Prepare Your Custom Patched init_boot Image
Because providing generic patched images is unsafe, you must patch your own:
- Download the official Pixel 7 Pro factory image matching your exact Build number from Google Developers.
- Extract the archive and locate
init_boot.img. - Transfer
init_boot.imgto your phone and patch it using the Magisk app. - Transfer the resulting
magisk_patched_xxxx.imgback to your computer and keep its distinct name in the Platform-Tools directory. Do not overwrite or lose the stockinit_boot.img.
3. Prepare Official Platform-Tools and Magisk Components
Prepare your workstation filesystem:
- Extract Google’s current Platform-Tools into an easily accessible directory (for example,
C:\platform-tools). - Place only the same-device
magisk_patched_xxxx.imgfrom the previous step in that directory. Record the installed Android build before flashing.
4. Connect Pixel 7 Pro and Authorize ADB Communication
Establish the debugging link between handset and computer:
- Connect the handset to your computer using a certified USB cable.
- Look at the phone display for the Allow USB debugging? prompt.
- Select the option to Always allow from this computer and tap Allow.
5. Unlock Bootloader via Fastboot Interface
Unlocking the bootloader is a mandatory prerequisite for flashing custom ramdisk partitions:
- Launch the execution script or open terminal and execute:
adb reboot bootloader - The Pixel 7 Pro will restart into the native fastboot interface, initially reporting DEVICE STATE - locked.
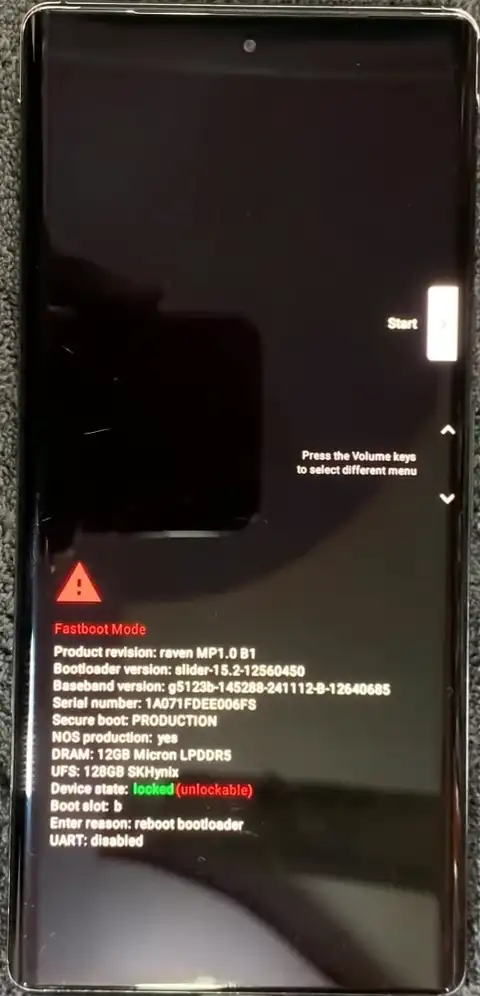
- Execute the unlock command:
fastboot flashing unlock - On the phone display, use the physical Volume buttons to highlight Unlock the bootloader, then confirm by depressing the Power button.
- The handset executes an automated cryptographic hardware wipe and restarts into fastboot mode displaying DEVICE STATE - unlocked.
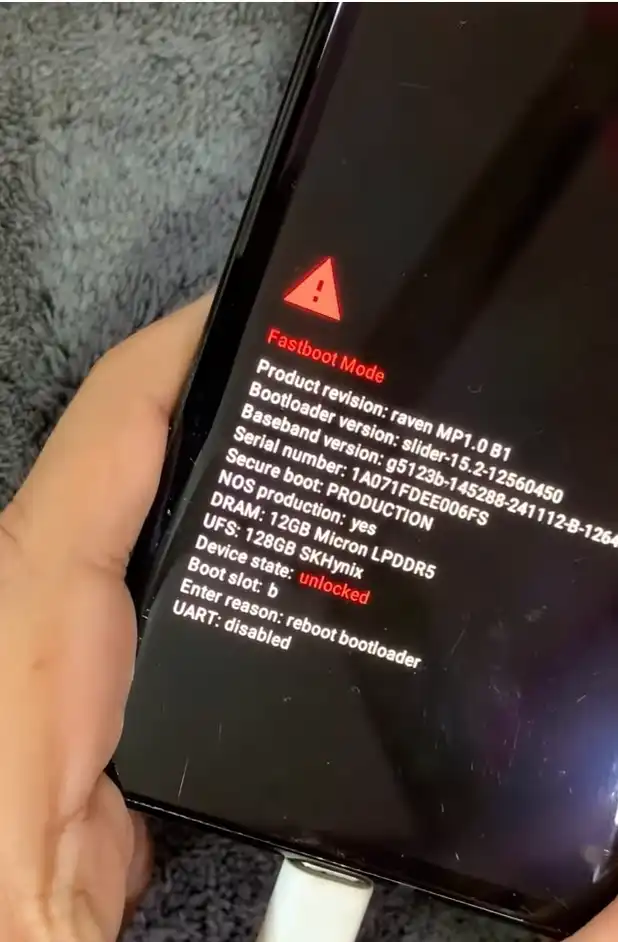
6. Flash Patched init_boot Ramdisk Image
Deploy the modified ramdisk containing Magisk superuser hooks:
- With the device in fastboot mode, allow the automated script to execute the flash sequence, or issue the fastboot command directly:
fastboot flash init_boot magisk_patched_xxxx.img - Fastboot will confirm writing to the active slot:
Writing 'init_boot'... OKAY. - Reboot normally with
fastboot reboot. Bootloader unlocking already erased userdata; an additional recovery reset is not required by Magisk’s official installation instructions.
7. Initialize Magisk and Verify Superuser Status
Finalize the software environment post-boot:
- Complete the initial Android 15 setup wizard.
- Connect to Wi-Fi, locate the Magisk stub application in the app drawer, or manually install the latest official Magisk APK.
- Open the Magisk application; if prompted to complete “Additional Setup,” select OK to allow the daemon to finalize ramdisk hooks and reboot the device.
- After rebooting, verify Magisk’s installed state and test only the root-dependent function you intended to use. Avoid adding an unrelated diagnostic APK solely for this check.
Root Capabilities and Technical Advantages
Operating with superuser privileges on the Google Pixel 7 Pro unlocks significant engineering flexibility:
| Capability | Technical Scope | Practical Application |
|---|---|---|
| Systemless Audio Stacks | Integration of Viper4Android and JamesDSP | Bypasses standard Android audio processing limits for high-fidelity DAC tuning |
| Kernel and Thermal Tuning | Direct sysfs access to Tensor G2 governor parameters | Custom frequency scaling, under-volting profiles, and thermal threshold optimization |
| Block-Level Backups | Raw extraction of block devices via dd | Creation of bit-for-bit forensic partition backups before experimental modifications |
| System App Management | Systemless debloating via overlayfs | Disables unneeded background services without corrupting Android Verified Boot |
Video Demonstration
Review this video demonstration illustrating bootloader preparation, fastboot execution, and Magisk verification on the Google Pixel 7 Pro:
Root Architecture and Device Management Questions
Why is init_boot patched instead of boot.img on the Pixel 7 Pro?
Starting with Google Tensor G2 and Generic Kernel Image architecture, the first-stage ramdisk was separated from boot.img and isolated into a dedicated init_boot partition. Magisk patches init_boot to inject root capabilities without altering the certified GKI Linux kernel.
Will unlocking the bootloader erase my personal device data?
Yes. Executing fastboot flashing unlock automatically initiates a hardware cryptographic wipe of the userdata partition. A complete external backup of photos, messages, and files must be completed prior to unlocking.
How does rooting affect banking apps and contactless mobile payments?
Unlocking the bootloader and establishing root causes the device to fail Google Play Integrity hardware attestation. Financial applications and contactless payments will restrict functionality. While advanced root-hiding modules exist, there is no guarantee that banking applications or Google Pay will function normally on a rooted device.
Can the Pixel 7 Pro be completely returned to stock unrooted state?
Yes. Flashing official Google factory firmware restores untouched stock partitions across both slots. The bootloader can then be relocked using fastboot flashing lock, returning the phone to factory security specifications.
Will my Pixel 7 Pro receive official monthly OTA updates after rooting?
Traditional automatic OTA installations will pause or fail signature checks due to modified partition headers. Rooted users typically apply OTA updates using Magisk inactive slot installation workflows or manual fastboot flashing without wiping data.