Android Utility Tool V187: Features, Setup, and Maintenance Guide
Android Utility Tool (commonly distributed as mTool or Android Utility) is a Windows-based multi-chipset maintenance software designed for mobile hardware technicians. It provides a graphical interface to interact with smartphones running MediaTek, Qualcomm Snapdragon, and Unisoc (Spreadtrum) processors during low-level pre-boot states, including BROM, Meta Mode, and EDL.
The interface advertises diagnostics, partition verification, firmware flashing, and factory-calibration functions. The exact V187.00.8024 package, file size, publisher identity, and operation support could not be authenticated from a signed release record during this review. Treat each function as an advertised capability until it is confirmed for the exact device, build, and package hash.
Android Utility Tool organizes its capabilities across dedicated hardware architectures. Important: Support for these functions is not universal. Compatibility depends entirely on the exact device model, SoC variant, OEM bootloader constraints, and the Android security patch level. Recent security patches frequently block these low-level diagnostic modes.
| Chipset architecture | Possible pre-boot modes | Functions shown or commonly associated with the interface |
|---|---|---|
| MediaTek (MTK) | BootROM (BROM), PreLoader, Meta Mode | Partition dump, DA handshake, NVRAM restoration, factory reset |
| Qualcomm Snapdragon | Emergency Download (EDL 9008), Diag Mode | Partition management, baseband diagnostics, unbricking |
| Unisoc (Spreadtrum) | SCI USB2Serial Mode | PAC firmware flashing support, calibration restore |
| Samsung Exynos / Android | Download Mode, ADB MTP Mode | CSC verification, MTP diagnostic commands |
Some advertised operations communicate through pre-boot interfaces before Android mounts normal storage. Access to one interface does not prove that a listed function is supported, authorized, or safe on every device using that chipset.
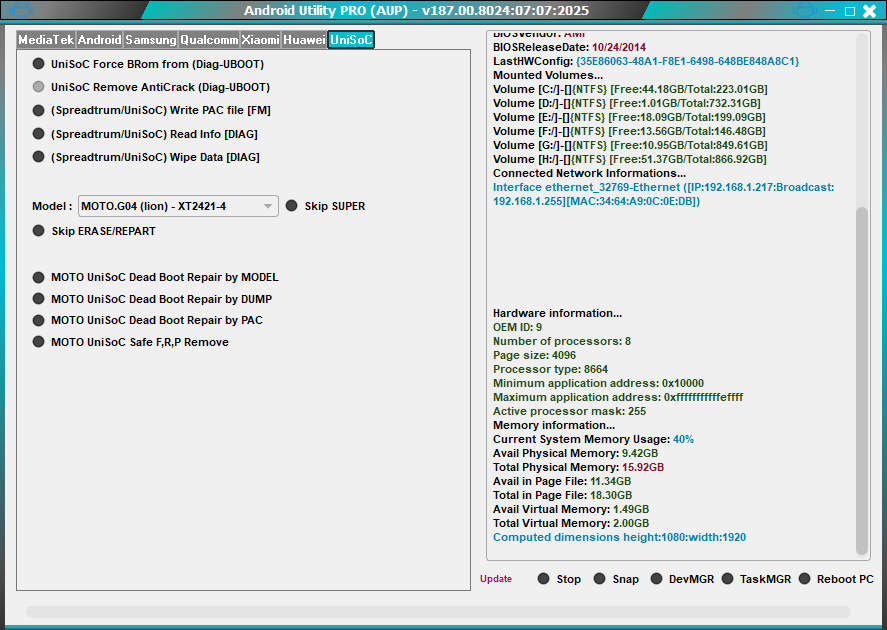
Android Utility Tool main graphical user interface displaying supported chipset modules.
System prerequisites and preparation
To ensure stable communication between the PC and connected hardware:
- Operating system: Windows 11, 10, 8.1, or 7 (64-bit or 32-bit).
- Microsoft .NET Framework: Version 4.8 or later is required for interface elements and module hooks.
- Chipset-specific USB drivers:
- For MediaTek hardware: MediaTek USB VCOM Drivers
- For Qualcomm Snapdragon: Qualcomm USB Drivers (QDLoader 9008)
- For Unisoc/Spreadtrum: Spreadtrum Unisoc Drivers
- For command-line operations: Android SDK Platform-Tools
- Direct USB port: Use a high-quality data-rated USB cable connected directly to a rear motherboard USB 2.0 port. Avoid passive USB splitters or unpowered front-panel hubs.
Software details and download
Android Utility Tool is distributed as a standalone portable package for Windows.
| Specification | Technical details |
|---|---|
| Software name | Android Utility Tool V187.00.8024 |
| Platform | Windows 11, 10, 8.1, 7 (x86 / x64) |
| Archive file size | Approximately 300 MB |
| Runtime requirement | Microsoft .NET Framework 4.8+ |
| Publisher-claimed portal | mfdl portal |
Note: GSM6 does not host this binary. Confirm the publisher, exact version, hash or signature, and device support from a traceable release before execution. Do not weaken or exclude the file from security scanning merely because it is described as a servicing utility.
How to install and operate Android Utility Tool
Follow these steps to set up and run the software on your Windows computer.
1. Prepare system environment and drivers
Before extracting the application, ensure that Microsoft .NET Framework 4.8 is installed on your Windows system. Install the relevant MediaTek, Qualcomm, or Unisoc USB driver packages so that Windows assigns valid COM ports when devices connect.
2. Extract the utility package
Download the archive from the developer portal. Right-click the compressed file and extract its contents to a local directory (e.g., C:\AndroidUtility). Avoid running the software directly from within a temporary zip reader.
3. Launch the application as administrator
Navigate to the extracted directory, right-click AndroidUtility.exe, and select Run as administrator. This grants the application necessary permissions to access physical USB ports and communicate with system driver interfaces.
4. Connect device in appropriate boot mode
Power off the target phone completely:
- MediaTek: Hold Volume Down (or Volume Up on select models) and insert the USB cable.
- Qualcomm: Hold Volume Up + Volume Down and connect to PC for EDL 9008 mode.
- Unisoc: Hold Volume Down and insert the cable to establish the SCI serial port.
Observe the software log window: the status indicator should acknowledge hardware connection and display the detected chipset ID.
5. Execute the maintenance procedure
Navigate to the appropriate brand or chipset tab in the top navigation bar. Select the desired operation (such as firmware flashing, partition inspection, or diagnostic reset), follow the on-screen prompts, and keep the cable connected until the software reports an operation completed status.
Troubleshooting common operation errors
Device not recognized or handshake timeout
If the application displays connection timeout or fails to detect the COM port:
- Open Windows Device Manager and check Ports (COM & LPT). If a yellow exclamation badge appears, reinstall the corresponding chipset driver.
- Disconnect the phone, perform a hard power-down (hold Power + Volume Down for 15 seconds), and retry the connection sequence.
Application crashes on startup (.NET error)
If Android Utility terminates immediately after launch:
- Confirm that .NET Framework 4.8 or a compatible .NET runtime is installed and fully updated via Windows Update.
- Ensure the application folder is extracted to a directory with standard read/write permissions rather than restricted system folders.
Technical references and related tools
For related servicing software and device driver setup: